Posts Tagged series
9. Setting Recordings via Info Bar or the Guide
Posted by 3viewer in Setting up your recordings on March 17, 2011
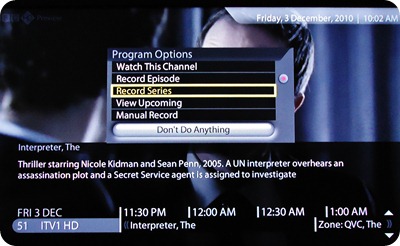
Setting a recording from the Info Bar.
You can set up your recordings in a number of ways. By far the easiest method is to simply press OK or Info whilst viewing a channel in order to access the Info Bar. Use the direction keys on the remote to navigate to the program you wish to record and once it is highlighted, click on OK. You will then be presented with the following choices; Watch this Channel, Record Episode, Record Series, View Upcoming and Manual Record.
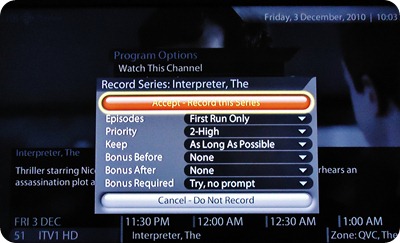
Setting up to record just that episode will turn the program blue in the Guide to signify that program has been set to record. If you choose to Record Series, then you will be offered the same choices as shown in the Recording Defaults settings page, namely which Episodes do you want recorded, what Priority do you wish to set up for this series ( in the case of any clashes for example) how long do you want to keep the recording, what padding or bonus do you wish to add, either before or after and what Bonus or padding is required.
The same default settings will be shown as you set them up previously in Recording Defaults. In order to change any of these settings for this particular recording, use the direction keys on the remote to scroll to each choice and then click on OK to change it. You can of course scroll down to the last choice and Cancel the recording altogether. Once you have set up your Series Recording it will be shown in the Info Bar and also in the full Guide as blue with two green ticks on the right hand side to indicate it has been set up as a Series Recording.
View upcoming allows you to see when the next episodes will be broadcast across all of the channels available in the Guide. Manual Record allows you to be even more specific about the recording being set, including changing the Start Time, the recording length, the channel, how often you want the recording made and the date. There are also more options that you can change by clicking on Other Options from the Manual record screen. Click on Accept once you are happy with your recording settings.
TIP! You can use the FF >> or RW << keys to skip forward or back six hours at a time in the Info Bar.
Using the Record Button
As longs as you have been watching a live program from the beginning and have stayed tuned to that channel continuously, you can press Record on the remote control and the whole of the current recording will be recorded and saved to the hard drive.
Setting a Recording from the Guide.
You can also set up a recording as you navigate around the Guide. Press the Guide button on the remote control, and then using the direction buttons, navigate to a program that you wish to record and then press OK. You will be presented with the same options as before in a drop down list consisting of Watch this Channel, Record Episode, Record Series, View Upcoming and Manual Record. Click on OK to choose the option you require. If you choose Record Series, you will be presented with further options to choose from as detailed in the previous chapter Setting a recording from the Info Bar.
TIP! You can get around the Guide quickly by using the FF>> REWIND<< buttons on the remote which allow you to skip six hours at a time and to move six channels up or down at a time, use the P+ P- buttons.
(Cont)
button, episode, guide, info bar, manual, record, recordings, series
Archives
Categories
- 3View Portal
- Acknowledgements
- BBC iPlayer
- Before you Begin
- Channels
- Connecting Up
- Deleting Recordings and Timers
- Home Page
- Index
- Installation
- managing your channels
- Managing your Recordings.
- Music
- Other Services
- Photos
- Recording Defaults
- Recording Defaults
- Registration
- Remote Control
- Setting a recording using search
- Setting up your recordings
- Setting Your Recordings.
- Settings
- System
- The Set up Wizard
- The Widgets
- TV Guide
- Videos
- Watching Live TV


